DIY Wooden Cabinet Plans for Every Room


Digitriserkamal
15 April 2026
Every beginner makes mistakes. That’s part of learning.
But some woodworking mistakes are more expensive than others — in wasted timber, wasted time, and pure frustration. Knowing what to watch for before you start is far smarter than discovering problems halfway through a build.
This guide covers the most common woodworking mistakes beginners make, why they happen, and exactly how to avoid them. Whether you’re about to start your first project or you’ve already hit a few problems along the way, these tips will make your next build cleaner, faster, and far less stressful.
Most woodworking mistakes don’t come from a lack of talent. They come from a lack of information.
Beginners rush. They skip steps that seem unnecessary. They assume, rather than measure. They start cutting before they’ve fully understood the plan.
The good news is that nearly every common woodworking mistake is entirely preventable. The fix is almost always the same: slow down, read the plan, and understand the process before you touch the wood.
With that in mind, let’s go through the most frequent errors — and how to stop them before they happen.
This is the most common woodworking mistake of all — and the most avoidable.
Many beginners glance at a plan, assume they understand it, and start cutting immediately. Then, three steps into the build, they discover a joint that requires a piece they’ve already cut the wrong size.
How to avoid it:
Ten minutes of reading saves hours of rework.
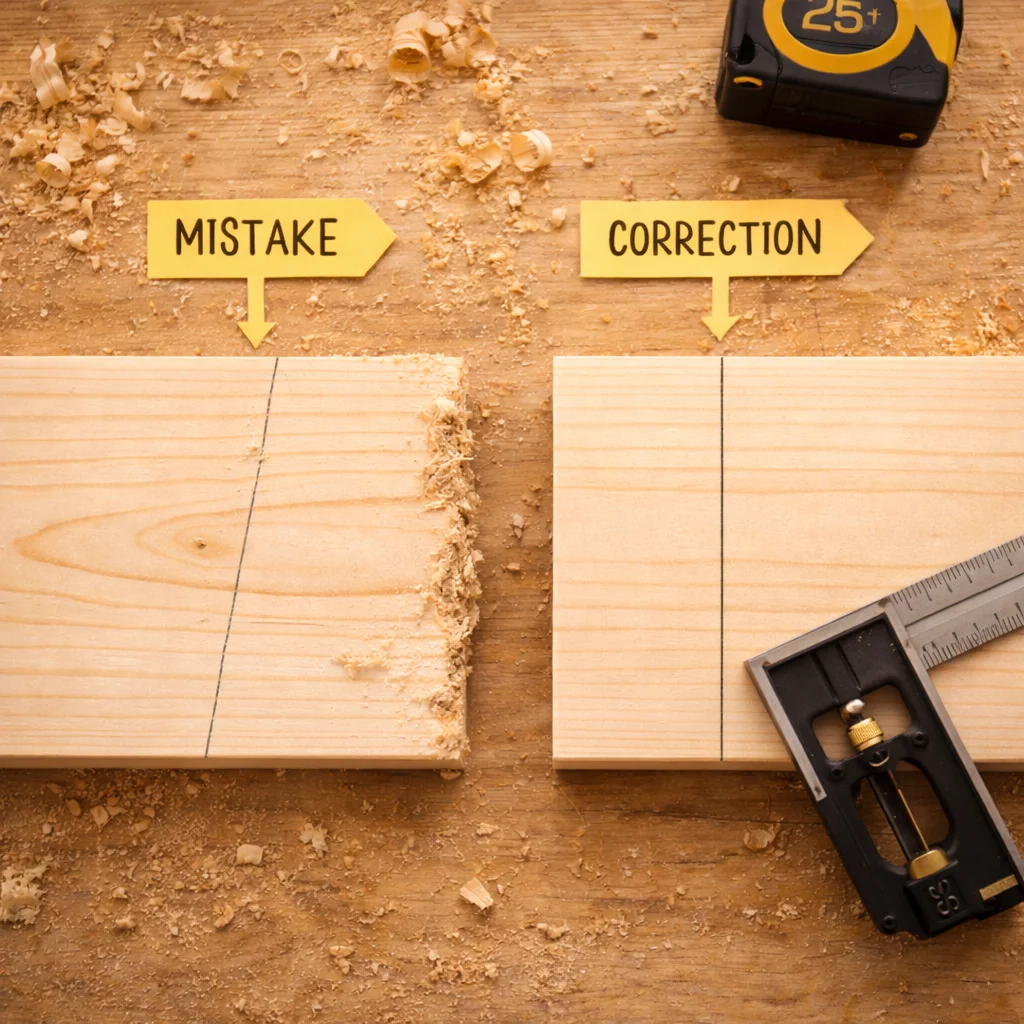
“Measure twice, cut once” is the oldest rule in woodworking. It exists because cutting too short is irreversible.
Beginners often measure once, mark quickly, and cut with confidence — only to find the piece is 5mm too short to fit. There’s no way to add wood back. You start again.
How to avoid it:
A sharp pencil line and two measurements take ten seconds. A miscut board costs you money and half an hour.
Wood grain is not just aesthetic — it affects strength, appearance, and how the wood behaves when cut.
Cutting against the grain produces rough, splintered edges. Assembling pieces with conflicting grain directions causes joints to crack as the wood expands and contracts with humidity changes.
How to avoid it:
Take a moment to look at the grain before every cut. It costs nothing and improves your results noticeably.
Dry assembly means putting the entire project together without glue or screws first. It’s a critical step that beginners almost always skip.
The result? They apply glue, press the joints together, and then discover a piece is slightly too wide, a hole is misaligned, or the frame won’t sit flat. At that point, fixing it is a race against drying time.
How to avoid it:
Dry assembly takes fifteen minutes. It can save your entire project.
A dull saw tears through wood instead of cutting it. A dull chisel slips and splits. A dull drill bit burns rather than bores.
Dull tools produce rough results and are significantly more dangerous than sharp ones. They require more force, which means less control.
How to avoid it:
Sharp tools are safer, faster, and produce cleaner results. Make sharpening part of your routine.
Sanding is the step beginners most often rush — and it shows in the finished piece.
Jumping straight to a fine grit without removing the rough surface first leaves scratches that become painfully visible once stain or varnish is applied. Sanding across the grain leaves permanent marks.
How to avoid it:
The finish is what the eye sees first. Take your time with it.
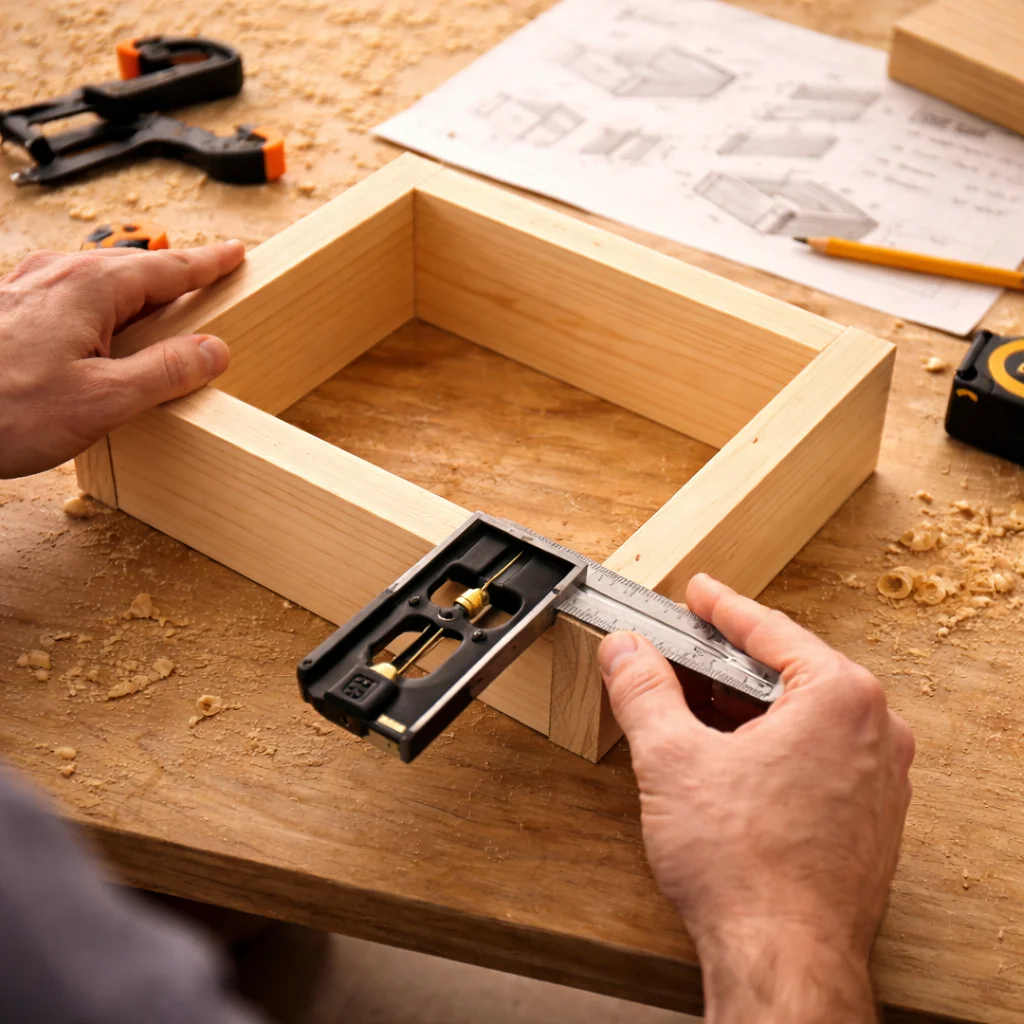
A frame that looks square to the eye can be off by several millimetres — and that error compounds through every subsequent step.
Drawers that won’t slide in. Doors that won’t hang straight. A tabletop that rocks on its base. These are all symptoms of an out-of-square assembly.
How to avoid it:
Square at every step means a finished piece that sits flat, looks professional, and functions properly.
Not all timber sold at hardware stores is suitable for furniture. Wet, twisted, or heavily knotted boards cause problems that no amount of skill can fix.
How to avoid it:
Spend an extra five minutes selecting your timber. It makes every step after it easier.
Driving a screw directly into timber — especially near an edge — often splits the wood. This is one of those common woodworking mistakes that beginners only make once.
How to avoid it:
A pilot hole takes three seconds. Replacing a split board takes an hour.
Every other mistake on this list feeds back into this one.
When beginners don’t follow their woodworking plan — skipping steps, improvising dimensions, substituting materials — they introduce variables that the plan wasn’t designed to handle. Problems compound. The build gets harder at every stage.
How to avoid it:
A good plan is written by someone who has already made all of these mistakes. Let their experience work for you.
The fastest way to avoid common woodworking mistakes is to work from a plan that anticipates them.
Every DIGITRISER woodworking plan is written with beginners in mind. The steps are sequenced to prevent errors. The cut lists are precise. The assembly notes flag the moments that need extra care.
You don’t have to learn everything the hard way.
Common woodworking mistakes are not a sign of failure. They’re a sign that you’re learning.
But the best way to learn is to understand the mistakes before they happen — not after. Measure twice. Read the plan. Dry-assemble before gluing. Keep your tools sharp.
Follow those principles on your next project and you’ll be surprised how smoothly it goes.
Now go build something.
[Get your DIGITRISER plans and start your next mistake-free build today →]
What are the most common woodworking mistakes beginners make?
The most common woodworking mistakes include not reading the plan before starting, measuring only once before cutting, skipping the dry assembly stage, using dull tools, and rushing through sanding. Most of these errors are entirely preventable with a little preparation and the right plan to guide each step of the build.
How do I avoid splitting wood when driving screws?
Always drill a pilot hole before driving any screw, especially near the edges or end grain of a board. Use a drill bit slightly smaller than the screw shank. For hardwoods and visible surfaces, also countersink the hole so the screw head sits flush with the surface. This simple step prevents splits and gives a cleaner, more professional finish.
Why does my woodworking project look uneven or out of square?
An uneven or out-of-square result is almost always caused by not checking for square during assembly. Use a combination square at every joint and measure both diagonals of any rectangular frame — they should be identical. Work on a known flat surface and apply clamp pressure on the longer diagonal to correct a frame before the glue sets.
We’re here to help! Whether you need guidance on choosing the right plans or have questions about our recommendations, our team is ready to assist. Reach out anytime—your success is our priority.