DIY Wooden Cabinet Plans for Every Room


Digitriserkamal
24 April 2026
Every piece of wooden furniture is held together by joints. Choose the right joint and your build is strong, clean, and built to last. Choose the wrong one and even the best timber will fail under normal use.
Understanding woodworking joints is one of the most important skills you can develop as a beginner. It shapes every decision you make — which projects you can tackle, how long a build takes, and how professional the finished result looks.
This guide covers the most essential woodworking joints, from the simplest butt joint to the elegant dovetail. For each one, you’ll learn what it is, when to use it, and how strong it really is.
A woodworking joint is more than a connection between two pieces of wood. It’s a mechanical solution to a structural problem.
Different joints resist different forces. Some resist pulling apart. Others resist racking — the sideways twist that collapses a chair or a shelf bracket. The right joint for a drawer is different from the right joint for a tabletop frame.
Learning to match the joint to the task is what separates furniture that lasts decades from furniture that fails in months.
The good news for beginners: you don’t need to master every joint before you start building. A small number of joints — mastered in sequence — covers the vast majority of projects you’ll ever want to build.
Let’s start at the beginning.

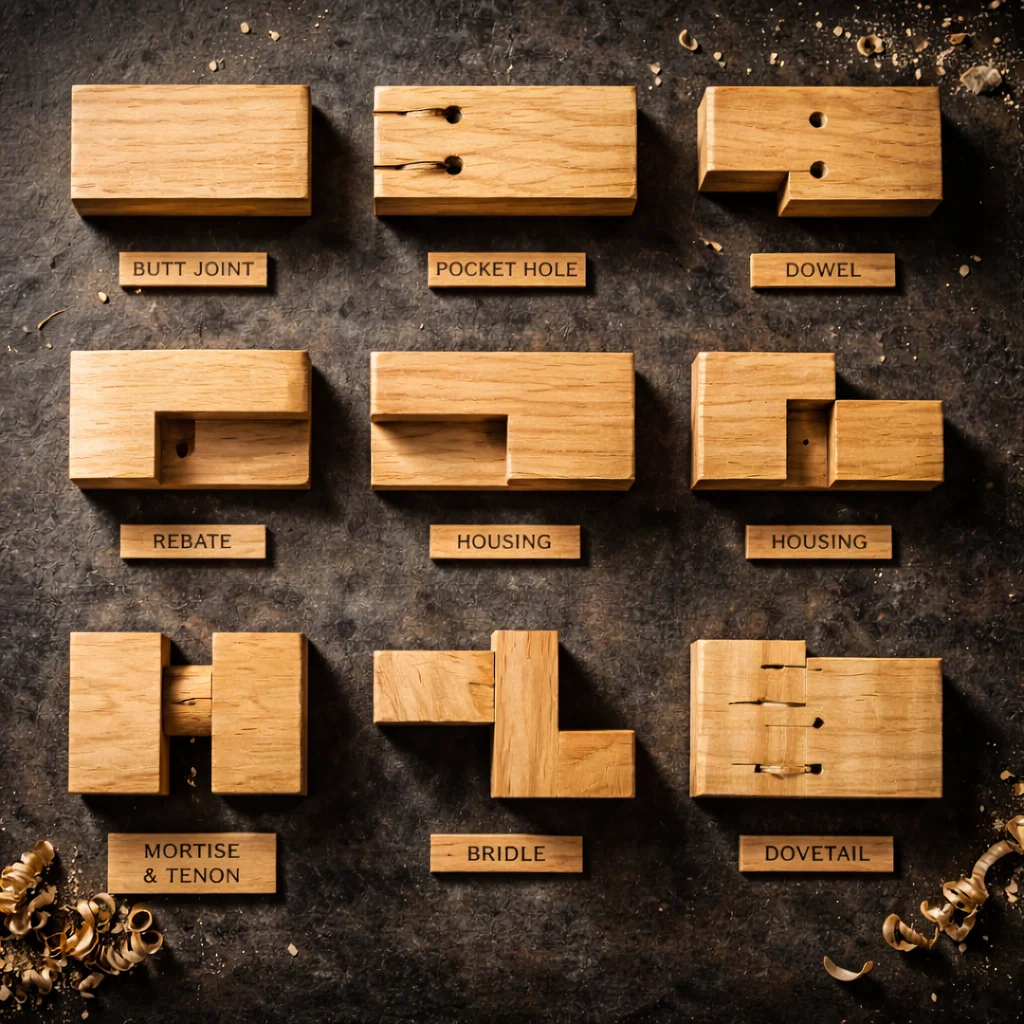
The butt joint is the simplest of all woodworking joints. One piece of timber butts squarely against the face or end of another, held with glue and screws or nails.
It’s fast, requires no special tools, and works perfectly well for structural frames, cabinet carcasses, and any application where the joint is hidden.
The weakness of the butt joint is its limited mechanical strength on its own — wood glue alone on end grain gives a relatively weak bond. Reinforce it with pocket screws, dowels, or metal brackets and it becomes genuinely reliable.
Best used for: cabinet boxes, frames, structural connections, anywhere the joint is hidden. Strength rating: Low (unreinforced) to moderate (with screws or brackets).
The pocket hole joint is the modern beginner’s best friend. A pocket hole jig drills an angled hole into one piece of timber. A special screw drives through that hole and into the adjoining piece, pulling the joint tight.
The result is fast, strong, and requires no complex cutting. A pocket hole joint takes under two minutes to make and produces a connection strong enough for most furniture applications.
It’s the joint used throughout DIGITRISER farmhouse table, bookshelf, and cabinet plans — because it delivers reliable results for beginners without specialist skill.
Best used for: face frames, apron-to-leg connections, box assembly, any joint that will be hidden or painted over. Strength rating: Moderate to good — excellent for furniture that doesn’t require disassembly.
A dowel joint uses short cylindrical wooden pegs — dowels — inserted into matching holes in both pieces of timber to align and reinforce the connection.
Dowels add significant mechanical strength to what would otherwise be a basic butt joint. They resist both pulling and racking forces effectively. The challenge is precision — the holes in both pieces must align perfectly, or the joint won’t close cleanly.
A doweling jig (around $20–$30) makes this achievable for beginners by guiding the drill bit to the correct position on each piece.
Best used for: edge-to-edge panel joints (tabletops, cabinet sides), furniture that needs to be disassembled and reassembled. Strength rating: Good — especially strong in edge-to-edge applications.
A rebate joint cuts an L-shaped channel into the edge or end of one piece, into which the second piece fits squarely. It’s the standard joint for attaching back panels to cabinet carcasses and for making simple drawer boxes.
The rebate creates a mechanical register — the second piece can’t pull out sideways — which makes this joint significantly stronger than a plain butt joint. It also hides the end grain of the back panel, giving a cleaner appearance.
A rebate can be cut with a router, a table saw, or a rebate plane. For beginners, a router with a straight bit is the most accessible option.
Best used for: cabinet backs, drawer boxes, window frames, housing shelf ends. Strength rating: Good — strong in shear, with natural mechanical resistance.
A housing joint cuts a groove across the grain of one piece, into which the end or edge of another fits. It’s the standard joint for fixed shelves in a bookcase or cabinet.
The groove holds the shelf in position and prevents it from sagging or pulling free under load. Unlike a simple butt joint, a housing joint transfers the load of the shelf contents directly into the carcass sides — making it far stronger under real use.
Cut housings with a router or a table saw. A straight edge guide keeps the cut square and consistent.
Best used for: fixed shelves, stair treads, drawer runners, internal dividers. Strength rating: Very good — excellent load-bearing capacity for shelving applications.
The mortise and tenon is one of the oldest and strongest woodworking joints in existence. A rectangular projection (the tenon) cut on the end of one piece fits into a matching rectangular cavity (the mortise) cut into the other.
This joint resists pulling, twisting, and racking simultaneously — which is why it’s used in chairs, tables, doors, and timber frames that need to withstand dynamic loads over decades.
It requires more skill and time to cut than the joints above. But a well-cut mortise and tenon joint, glued with quality wood glue, is stronger than the timber around it.
Cut the mortise with a drill and chisel, or with a mortiser. Cut the tenon with a table saw, bandsaw, or tenon saw and shoulder plane.
Best used for: chair legs and rails, table aprons, door frames, any joint subject to racking forces. Strength rating: Excellent — one of the strongest joints in woodworking.
The bridle joint is a variation of the mortise and tenon — but where the tenon slots into an open slot (the bridle) rather than a closed mortise. It’s faster to cut than a full mortise and tenon and is used widely in frame corners and T-junctions.
The open slot makes it easy to assemble and provides a large gluing surface. It’s visible from the outside, so it’s often used as a decorative joint in exposed frames.
Best used for: frame corners, leg-to-rail connections, garden furniture, exposed structural frames. Strength rating: Very good — strong in all directions when glued.
The dovetail is the joint most associated with craftsmanship. Its interlocking fan-shaped tails and pins create a mechanical connection that resists pulling in one direction without any fasteners or glue.
It’s used in the corners of drawers, blanket boxes, and cabinet carcasses — anywhere that the joint is subject to repeated pulling forces, and anywhere the joint is meant to be seen and admired.
Cutting dovetails by hand requires practice. A dovetail jig and router makes them achievable for intermediate beginners. Either way, the first time you fit a perfectly cut dovetail joint together, you understand why woodworkers have used this design for thousands of years.
Best used for: drawer corners, blanket boxes, cabinet carcasses, display pieces where the joint is part of the design. Strength rating: Outstanding — mechanically resistant to pulling without any adhesive.
You don’t need to master all eight joints before you build your first project. Here’s a sensible progression:
Every DIGITRISER woodworking plan specifies which joints are used and provides step-by-step guidance on cutting them correctly. You learn the joint in the context of an actual project — which is always the fastest way to build real skill.
Understanding woodworking joints is what separates someone who builds things from someone who builds things that last.
Start simple. Master the pocket hole joint and the butt joint. Build projects with them. Then add the rebate, the housing, and eventually the mortise and tenon to your repertoire.
Each joint you learn opens up new projects, new levels of quality, and new confidence at the workbench.
The dovetail is waiting for you. You’ll get there.
[Get your DIGITRISER woodworking plans and start building better joints today →]
What is the strongest woodworking joint for furniture?
The mortise and tenon joint is widely considered the strongest woodworking joint for furniture. When cut accurately and glued with quality wood adhesive, it resists pulling, racking, and twisting simultaneously — making it the standard joint for chairs, tables, and door frames that must withstand decades of dynamic use. For purely pull-resistant applications, the dovetail joint is mechanically unmatched.
What woodworking joints should a beginner learn first?
Beginners should start with the pocket hole joint. It’s fast, requires minimal skill, produces reliable results, and covers the majority of furniture-making applications. Once comfortable with pocket holes, learn the butt joint with dowel reinforcement for panel work, then progress to rebate and housing joints for cabinet and shelf construction.
Do you need special tools to cut woodworking joints?
Some joints require specific tools and others don’t. Butt joints need only a saw and drill. Pocket hole joints require a pocket hole jig ($25–$60). Rebate and housing joints are best cut with a router. Mortise and tenon joints can be cut with a saw, drill, and chisel. Dovetails can be cut by hand with a dovetail saw and chisel, or with a router and dovetail jig for greater consistency.
We’re here to help! Whether you need guidance on choosing the right plans or have questions about our recommendations, our team is ready to assist. Reach out anytime—your success is our priority.